Appraisals
In Odoo, the Appraisals application can be used to evaluate employee performance on a recurring basis. Managers can evaluate the performance of their employees, and also allow employees to do a self-assessment of their own. Appraisals are customizable, and can be set for any kind of schedule desired.
Appraisals give employees valuable feedback, including actionable goals to work toward, and measurable skills to improve upon. Additionally, appraisals may form the basis for raises, promotions, and other benefits.
Regular appraisals are good for both the employees and the company, since they can accurately measure performance based on company goals, and show employees where they need to improve.
Configuration
The Configuration menu in the Appraisals application is where the settings can be configured, feedback templates can be edited, frequencies can be set, evaluation scales can be managed, data for 360 feedback can be stored, and goal tags can be viewed/created.
Settings
To access the Settings menu, navigate to .
Feedback templates
Feedback templates are form outlines used during an employee appraisal. Any edits made to a template are, ultimately, reflected in the appraisals sent to employees.
There are two default templates pre-configured in Odoo Appraisals: one for employee feedback, and one for manager feedback. Each contains several sections, along with questions, and brief explanations for how to respond to the questions.
The Employee Feedback Template has the following sections: My work, My future, and My feelings.
The Manager Feedback Template has the following sections: Feedback, Evaluation, and Improvements.
Any desired changes to the default feedback templates can be made by making changes directly in each template.
Appraisals
The Appraisals section of the settings menu determines the frequency that appraisals are performed, and if it is possible to request additional feedback.

Appraisals plans
By default, appraisals are pre-configured to be automatically created six months after an employee is hired, with a second appraisal exactly six months after that.
Once those two initial appraisals have been completed in the employee’s first year, following appraisals are only created once a year (every twelve months).
To modify this schedule, change the number of months in the blank fields under the Appraisals Plans section.
Important
If the Appraisals Plans section is modified, all empty Next Appraisal Dates are modified for all employees.
360 feedback
The 360 Feedback option can be enabled to allow managers to request feedback from other employees using a different survey form, at any time, independent of the appraisal schedule.
Typically, managers ask for feedback from other people who work with an employee they manage. This includes the employee’s various managers, peers, and direct reports.
To view the 360 Feedback survey, click the → Internal link icon at the end of the Default Template field. The 360 Feedback survey loads, and any desired changes to the survey can be made.
For more information on how to edit a survey, refer to the Create surveys document.
Important
The 360 Feedback form is a pre-configured survey within the Surveys application. In order to use the 360 Feedback option, including the ability to edit the survey, the Surveys application must be installed.
Evaluation scale
On each employee appraisal form, final rating options appear by default. To view and edit these options, navigate to . This presents the ratings in a list view.
The pre-configured ratings are Needs Improvement, Meets Expectations, Exceeds Expectations, and Strongly Exceeds Expectations. To add another rating, click the New button.
When the New button is clicked on the Evaluation Scale page, a blank line appears at the bottom of the list. Enter the name of the rating in the field.
To rearrange the order of the ratings, click the (six small gray boxes) icon to the left of a rating, and drag the rating to the desired position on the list.

360 feedback
The 360 Feedback section displays information for all the surveys currently configured in the Appraisals application. To view the surveys, and their statistics, navigate to .

Each appraisal (or survey) is presented in its own line on the 360 Feedback page, along with various information related to that particular appraisal.
Each appraisal includes the following information:
Survey Name: the name of the specific survey.
Responsible: the employee responsible for the survey, including the month and year they were given that designation.
Questions: the number of questions in that particular survey.
Average Duration: the average time a user spends completing the survey.
Registered: the number of people who have been sent the survey.
Completed: the number of people who have completed the survey.
Each appraisal also has two buttons at the end of each line: a Test button and a See Results button.
To see what an appraisal looks like for the end user (i.e. an employee), click the Test button, and the appraisal loads in a new browser tab. The entire appraisal loads, and can be clicked through without having to enter any answers.
To exit, close the tab. Or, click This is a Test Survey. → Edit Survey at the top of the page to be taken to the detail form for that particular survey.
To view the results from everyone who completed an appraisal, click the See Results button. This presents all the answers for the survey in a new tab. Each question provides information on how many people responded to a question, and how many people skipped it. All answers for each question are visible.
To exit, close the tab. Or, click → Edit Survey at the top of the page to be taken to the detail form for that particular survey.
In addition to viewing the responses from past appraisals and surveys, new surveys can also be created from the 360 Feedback page. Simply click the New button in the top-left of the page to create a new survey.
For more information on how to create a survey, refer to the Create surveys document.
Note
In previous versions of Odoo, this section was referred to as Surveys.
Appraisals
Navigate to the main Appraisals dashboard by opening the Appraisals application. The Appraisals dashboard is the default view.
To view the dashboard at any point in the application, navigate to .
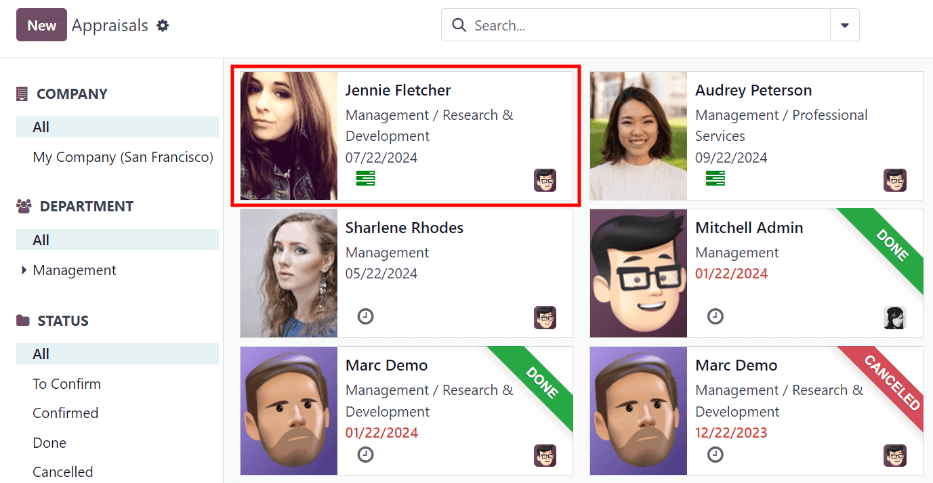
All appraisals are displayed on the dashboard in a Kanban view, by default, with a list of groupings on the left side of the dashboard, including Company, Department, and Status.
Click any grouping option to view appraisals for only the chosen selection.
Note
Only groupings with multiple selections appear in the list. For example, if a database only has one company, the Company grouping does not appear, since there is no other company to select.
Each appraisal card displays the following information:
Name: the employee’s name.
Department: the department the employee is associated with.
Company: the company the employee works for. This only appears in a multi-company database.
Date: the date the appraisal was requested, or is scheduled for in the future.
Activities: any activities that are scheduled for the appraisal, such as Meetings or Phone Calls. If no activities are scheduled, an activity can be scheduled from the 🕘 (clock) icon, located in the bottom-left corner of an appraisal card.
Manager: the employee’s manager, indicated by the profile icon in the bottom-right corner of an appraisal card.
Status banner: the status of the appraisal. A banner appears if an appraisal is marked as either Canceled or Done. If no banner is present, that means the appraisal has not happened, or has not been scheduled yet.
To view the details of any appraisal, click on the card to open the appraisal form.
New appraisal
To create a new appraisal, click the New button at the top of the Appraisals dashboard to load a blank appraisal form. Then, enter the following information on the form:
Name: enter the employee’s name.
Manager: select the employee’s manager from the drop-down menu. The manager is responsible for completing the Manager’s Feedback section of the appraisal. This field auto-populates after the employee is selected, if they have a manager set on their employee profile.
Appraisal Date: the current date is automatically entered in this field. This field is automatically updated once the appraisal is completed or canceled, with the corresponding date of completion or cancellation.
Department: select the employee’s department from the drop-down menu. This field auto-populates after the employee is selected, if they have a department set on their employee profile.
Company: select the employee’s company from the drop-down menu. This field auto-populates after the employee is selected, if they have a company set on their employee profile.
Note
The only required fields for the appraisal form are the employee’s Name, the Manager, and the Company.
Once the form is complete, click the Confirm button to confirm the appraisal request.
Once confirmed, the employee receives an email stating that an appraisal was requested, and is then prompted to schedule an appraisal date.
The status changes to Confirmed, and the Employee’s Feedback section of the Appraisal tab is grayed out. The information in that section only appears after the self-assessment is published by the employee. The Final Rating field also appears once the appraisal request is confirmed.
If there are any existing appraisals for the employee, an Appraisal smart button appears at the top of the page, listing the total number of appraisals there are for the employee.
Ask for feedback
As part of the appraisal process, the manager can request feedback on an employee from anyone in the company. Feedback is usually requested from co-workers and other people who interact with, or work with, the employee. This is to get a more well-rounded view of the employee, and aid in the manager’s overall assessment.
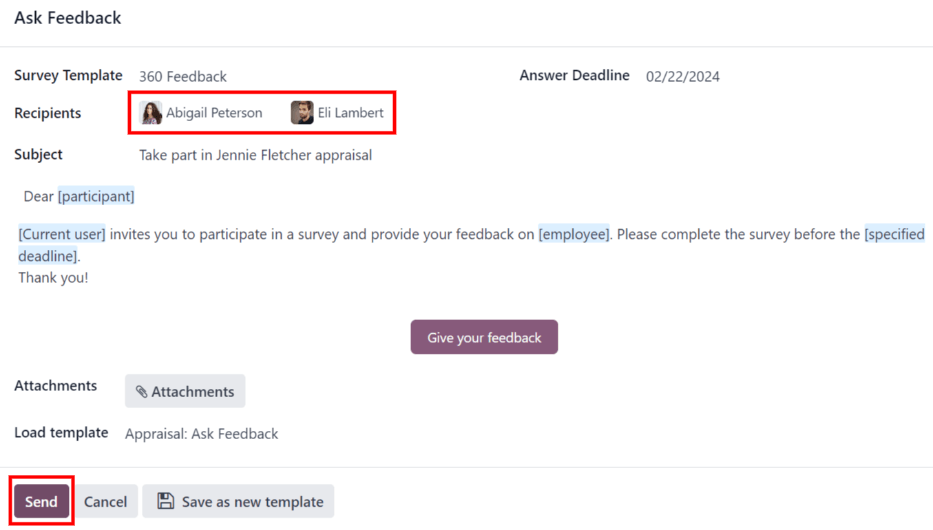
To request feedback, the appraisal must be confirmed. Once confirmed, an Ask Feedback button appears at the top of the form.
When the Ask Feedback button is clicked, an Ask Feedback email pop-up form appears, using the Appraisal: Ask Feedback email template, which sends the 360 Feedback survey.
Enter the employees being asked to complete the survey in the Recipients field. Multiple employees may be selected.
The email template has dynamic placeholders to personalize the message. Add any additional text to the email, if desired.
If required, an Answer Deadline can be added, as well.
If any attachments are needed, click the Attachments button, and a file explorer window appears. Navigate to the file(s), select them, then click Open.
When the email is ready to send, click Send.
Appraisal form
Once an appraisal is confirmed, the next steps are for the employee to fill out the self-assessment, after which the manager completes their assessment.
Employee’s feedback
To complete their portion of feedback, employees should navigate to the main dashboard, where the only entries visible are appraisals for the employee, themselves, and/or anyone they manage and have to provide manager feedback for.
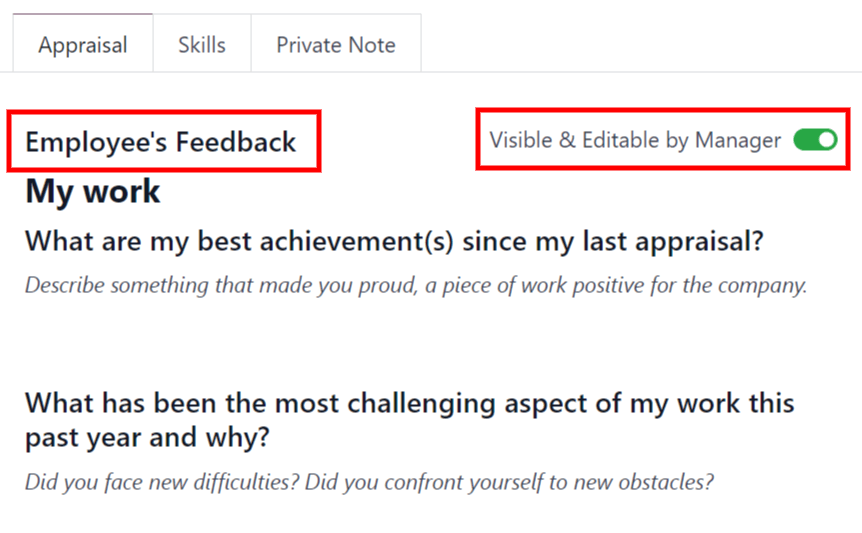
Click on the appraisal to open the appraisal form. Enter responses in the Employee’s Feedback section, under the Appraisal tab.
When completed, click the Not Visible to Manager toggle (the default setting once an appraisal is confirmed). When clicked, the toggle changes to Visible to Manager.
Manager’s feedback
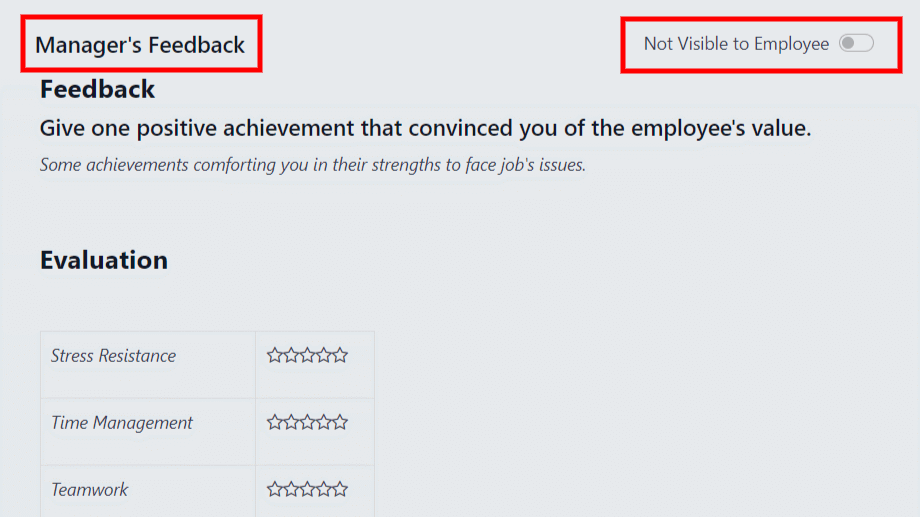
After the employee has completed the Employee’s Feedback section, under the Appraisal tab, it is time for the manager to fill out the Manager’s Feedback section.
The manager enters their responses in the fields in the same manner as the employee.
When the feedback section is completed, click the Not Visible to Employee toggle (the default setting once an appraisal is confirmed). When clicked, the toggle changes to Visible to Employee.
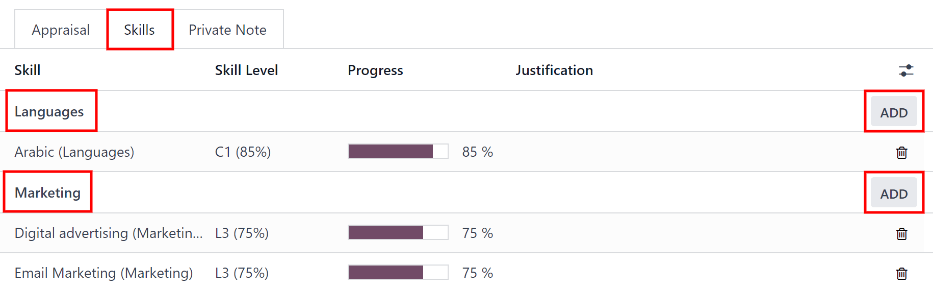
Skills tab
Part of an appraisal is evaluating an employee’s skills, and tracking their progress over time. The Skills tab of the appraisal form auto-populates with the skills from the employee form, once an appraisal is confirmed.
Each skill is grouped with like skills, and the Skill Level, Progress, and Justification are displayed for each skill.
Update any skills, or add any new skills to the Skills tab.
If a skill level has increased, a reason for the improved rating can be entered into the
Justification field, such as took a fluency language test or received Javascript
certification.
Refer to the Create a new employee document for detailed instructions on adding or updating a skill.
After an appraisal is completed, and the skills have been updated, the next time an appraisal is confirmed, the updated skills populate the Skills tab.
Private note tab
If managers want to leave notes that are only visible to other managers, they can be entered in the Private Note tab. The employee being evaluated does not have access to this tab, and the tab does not appear on their appraisal.
Schedule a meeting
Once both portions of an appraisal are completed (the employee and manager feedback sections), it is time for the employee and manager to meet and discuss the appraisal.
A meeting can be scheduled in one of two ways: either from the Appraisals application dashboard, or from an individual appraisal card.
To schedule an appraisal from the dashboard of the Appraisals application, first navigate to .
Click the 🕘 (clock) icon, beneath the appraisal date on the desired appraisal card, and a Schedule Activity pop-up window appears. Then, click + Schedule an activity to create a blank activity form.
Select Meeting for the Activity Type from the drop-down menu. Doing so causes the form to change, so only the Activity Type and Summary fields appear.
If scheduling an activity other than a meeting, such as a Call or a To-Do, the fields that appear on the Schedule Activity pop-up form change, accordingly.
Note
The 🕘 (clock) icon may appear as a number of different icons, depending on what, if any, scheduled activities are in place, and the color represents their corresponding due dates.
If no activities are scheduled, that is represented by a gray 🕘 (clock) icon.
However, if a specific activity is scheduled, the icon may appear as a 📞 (phone) icon for a phone call, a 👥 (group of people) icon for a meeting, and so on.
The color of the icon indicates the status; a green icon means an activity is scheduled in the future, and a red icon means the activity is past due.
For more details on activities, refer to the Activities document.
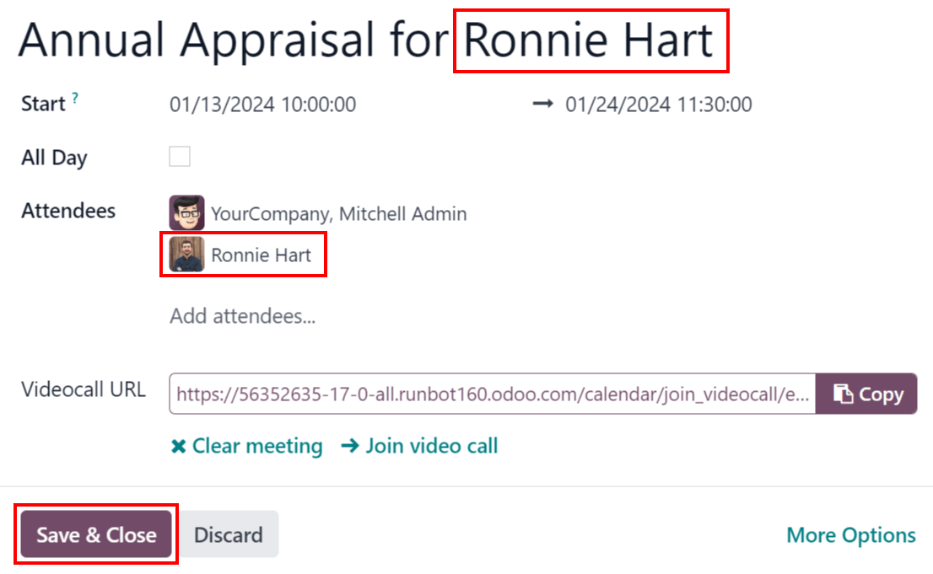
Enter a brief description in the Summary field of the Schedule Activity
pop-up window, such as Annual Appraisal for (Employee).
Next, click the Open Calendar button. From the calendar page that appears, navigate to, and double-click on, the desired date and time for the meeting.
Doing so opens a New Event pop-up form. From this pop-up form, make any desired modifications, such as designating a Start time, or giving a Name to the meeting.
Add the appraisee in the Attendees section, and include anyone else who should be in the meeting, if necessary.
To make the meeting a video call, instead of an in-person meeting, click + Odoo meeting, and a Videocall URL link appears in the field.
Once all the desired changes are complete, click Save & Close.
The meeting now appears on the calendar, and the invited parties are informed, via email.
The other way to schedule a meeting is from the individual appraisal form. To do this, navigate to the dashboard, then click on an appraisal card.
Next, click on the Meeting smart button, and the calendar loads. Follow the same directions above to create the meeting.
Note
If no meetings are scheduled, the Meeting smart button says No Meeting.
Goals
The ability to set goals for employees to work toward is an important feature of Odoo Appraisals. Goals are typically set during an appraisal, so the employee knows what they need to work toward before their next appraisal.
To view all goals, navigate to . This presents all the goals for every employee, in a default Kanban view.
Each goal card contains the following information:
Skill: the name of the goal.
Name: the employee the goal is assigned to.
Deadline: the due date for the goal.
Progress: the percentage of competency set for the goal.
Employee: the profile icon of the employee the goal is assigned to.
If a goal is completed, a Done banner appears in the top-right corner of the goal card.
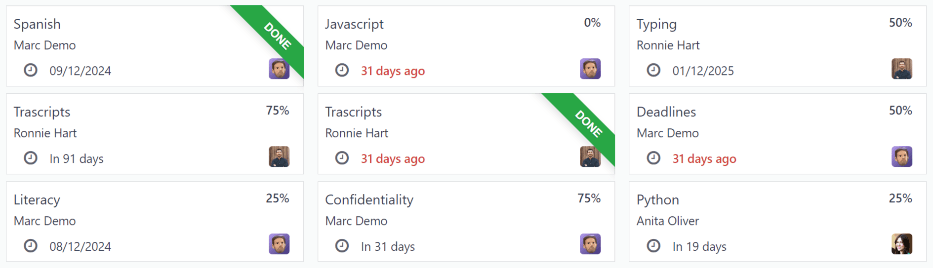
Note
Every individual goal requires its own entry for each employee. If employees have the same goal,
a goal card for each employee appears on the list. For example, if both Bob and Sara have the
same goal of Typing, two cards appear in the Kanban view: one Typing goal for Bob, and
another Typing goal for Sara.
New goal
To create a new goal, navigate to , and click New to open a blank goal form.
Enter the information on the card. The information requested is all the same information that appears on the goal card in the Kanban view, with the addition of a Tags field and a Description tab.
The current user populates the Employee field by default, and the Manager field populates with the manager set on the employee profile.
Make any necessary changes to the form, and add any notes that might be useful to clarify the goal in the Description tab.

Completed goals
When a goal has been met, it is important to update the record. A goal can be marked as Done in
one of two ways: from the main Goals dashboard, or from the individual goal card.
To mark a goal as Done from the main Goals dashboard, click on the ⋮ (three
dots) icon in the top-right of a goal card.
Important
The ⋮ (three dots) icon only appears when the mouse hovers over the corner of a goal card.
Then, click Mark as Done from the resulting drop-down menu. A green Done banner appears in the top-right corner of the goal card.
To mark a goal as Done from the goal card itself, click on a goal card to open that goal’s form.
Then, click the Mark as Done button in the top-left of the form. When clicked, a green
Done banner appears in the top-right corner of the goal form.
Reporting
The Appraisals application tracks two metrics across two different reports: an appraisal analysis, and a skills evolution.
Appraisal analysis
To access the Appraisal Analysis report, navigate to . This displays a report of all the appraisals in the database, highlighted in different colors to represent their status.
Appraisals in yellow are completed, appraisals in orange are in-progress (the appraisal is confirmed, but not completed), and appraisals in gray are scheduled (according to the Appraisals plans), but have not been confirmed yet.
The report displays the whole current year, by default, grouped by department.
To change the calendar view presented, change the date settings in the top-left of the report. The options to display are Day, Week, Month, and Year. Use the arrows to move forward or backward in time.
At any point, click the Today button to present the calendar to include today’s date in the view.
The report can have other filters and groupings set in the Search… bar at the top.

Skills evolution
To access the Skills Evolution report, navigate to . This displays a report of all skills, grouped by employee.
All the lines of the report are collapsed, by default. To view the details of a line, click on a line to expand the data.
Each skill has the following information listed:
Employee: name of the employee.
Skill Type: the category the skill falls under.
Skill: the specific, individual skill.
Previous Skill Level: the level the employee had previously achieved for the skill.
Previous Skill Progress: the previous percentage of competency achieved for the skill (based on the Skill Level).
Current Skill Level: the current level the employee has achieved for the skill.
Current Skill Progress: the current percentage of competency achieved for the skill.
Justification: any notes entered on the skill explaining the progress.
